Art Class Demos from Sept 2010. This page is a compilation of lessons beginning in the Fall of 2010. The images are of demonstrations from the Tuesday watercolor and Wednesday drawing and painting class. Watercolor meets Tuesday mornings 10-1 pm 15$ drop in Drawing and painting meets Wednesday evenings 7-9pm 15$ drop in Until end of July 2011 then beginning again Sept 6 and 7. Click on images to enlarge  This complicated European town scene requires quite a bit of simplification to make it manageable. July, 2011.  Detail  Watercolor demo of an old house  Here we add figures to a scene rendered in point perspective  These next few sketches were done on my recent trip to Hawaii. I used a small (8x8") sketch book, a pencil, a sharpie and a set of semi moist pan watercolors.       Below is demo showing use of multiple perspective points on a complicated interior scene.   These two paintings were done at the same class. They show two different techniques for painting rocks. Done at the Tuesday morning watercolor class at OSA June 15th, 2011   Here is a chalkboard demo showing the use of one point perspective to draw a street scene. Note the camera lens distortion on the sides. This can cause confusion when using photos for reference, too.  This lesson was all about green. Mixing Cad yellow Lt and Prussian blue with warm tones to create a variety of green for landscapes.  This is a rare oil painting demo I did at the night meeting. I painted it almost exclusively with a piece of fabric. The monochromatic color scheme allows me to concentrate on values and it creates a certain mood.  This simple line and wash drawing shows one point perspective.  This page shows three different types of linear perspective. One point, two point and isometric. This watercolor demo is about a warm background and cool foreground. It is the opposite of what we usually think of in landscape painting because atmospheric perspective is that things are bluer as they are further away and warmer colors in the foreground.  First I set the color key with a warm wash of Raw sienna and Aliziran Crimson  Next I paint the rocks and water using the same two colors.  Finally I use a mixture of Ultra and Prussian blue with Burnt sienna to indicate the foreground in shadow  Portrait drawing. This is an interesting way to draw. Usually for this kind of drawing we draw the shadow shapes, but by using white chalk on black paper, we draw the shapes of light.  Watercolor demo May 17th, 2011  Isometric perspective of blocks and cylinders  Simple still life. Drawing the light instead of the shadow. White chalk on black paper  |
| Here is a drawing of Abe I did during the portrait drawing workshop.I did it free hand with no grid or critical sighting. |
 |
| I set this up in my studio and did this drawing in about an hour. It is not completely accurate, but it is done with medium hardness charcoal so it is easy to correct. I will work on it a little more. |
 |
| Here is a drawing I did using the grid system. I took the photo below and drew a 1/2" grid over it. Then I drew a 1" grid on my paper. I use the grid to find coordinates to keep the proportions correct. For this to work there must be the same number of grid lines on the photo and the drawing. (I erased the grid lines on the drawing for a better finish. ) |

Class Demonstrations Fall 2010
This post lists the in class demos I did at the OSA Tuesday morning watercolor class in the fall of 2010.
 |
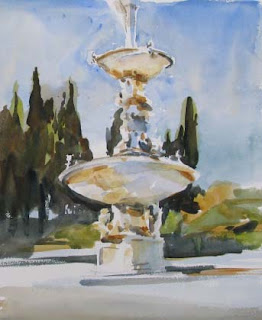
| This is a photocopy of the original JSS painting |
 |
| Here is a quick study I made to check my color choices |
 |
| This is my finished copy |
8. The next two images were painted the same class. They show warm and cool paintings..
 |
| Here is the cool |
 |
| and here is the warm |
 |
| Realistic fruits in an abstract space |
6. This day I chose colors based solely upon their value. The hues are chosen almost randomly. It is all about the value of the color, not the hue.
 |
| This is a great technique to push color. |
5. Today we painted a seascape
 |
| This seascape is very much about controlling washes and edges.\ |
4. Artists often paint from their imagination. Here is one I did
 | |
| This one is all out of my head. |
3. This one shows how to do a portrait using the grid system.
 | |||||||
| Here is the finished portrait. It is a little long in the upper lip, otherwise pretty good. |
 |
| Here is the original photo with a pencil grid drawn on it. |

2. This lesson is about painting a head on toned paper. This is a copy of Michelangelo's Delphic Sybil.

1. Here I isolate the shadow shapes to create a likeness. I also lifted the lights with tissue.